Developer Guide
MediBook Developer’s Guide
Table of Contents
- Acknowledgements
- Setting up, getting started
- Design
- Implementation
- Documentation, logging, testing, configuration, dev-ops
- Appendix: Requirements
- Appendix: Instructions for manual testing
- Appendix: Planned Enhancements
- Appendix: Effort
Acknowledgements
- AB3 for being the base we build our project on.
- JavaFX for creating the Graphic User Interface of MediBook.
- JUnit5 for testing capability.
Setting up, getting started
Refer to the guide Setting up and getting started.
Design
Architecture
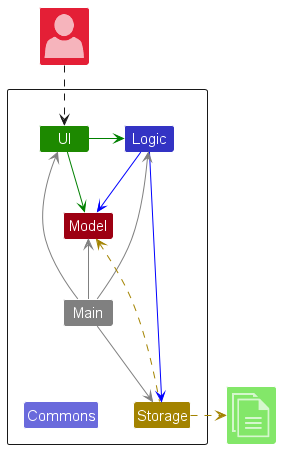
The Architecture Diagram given above explains the high-level design of the App.
Given below is a quick overview of main components and how they interact with each other.
Main components of the architecture
Main (consisting of classes Main and MainApp) is in charge of the app launch and shut down.
- At app launch, it initializes the other components in the correct sequence, and connects them up with each other.
- At shut down, it shuts down the other components and invokes cleanup methods where necessary.
The bulk of the app’s work is done by the following four components:
UI: The UI of the App.Logic: The command executor.Model: Holds the data of the App in memory.Storage: Reads data from, and writes data to, the hard disk.
Commons represents a collection of classes used by multiple other components.
How the architecture components interact with each other
The Sequence Diagram below shows how the components interact with each other for the scenario where the user issues the command delete 1.
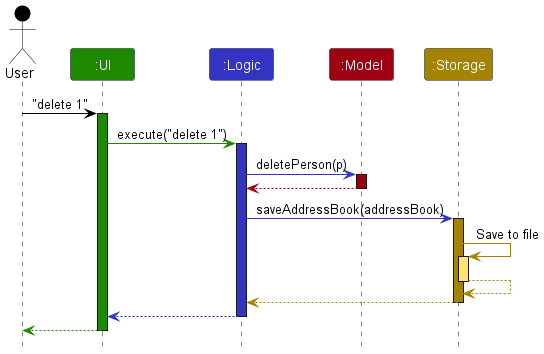
Each of the four main components (also shown in the diagram above),
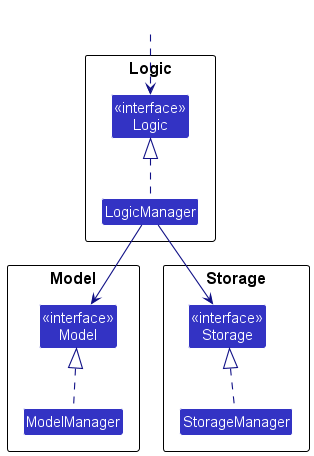
- defines its API in an
interfacewith the same name as the Component. - implements its functionality using a concrete
{Component Name}Managerclass (which follows the corresponding APIinterfacementioned in the previous point.
For example, the Logic component defines its API in the Logic.java interface and implements its functionality using the LogicManager.java class which follows the Logic interface. Other components interact with a given component through its interface rather than the concrete class (reason: to prevent outside component’s being coupled to the implementation of a component), as illustrated in the (partial) class diagram below.
The sections below give more details of each component.
UI component
The API of this component is specified in Ui.java
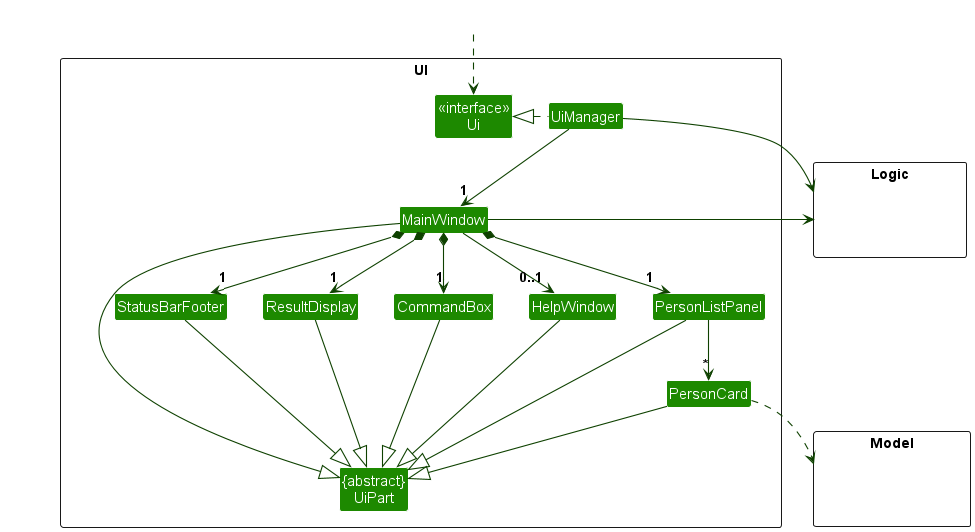
The UI consists of a MainWindow that is made up of parts e.g.CommandBox, ResultDisplay, PersonListPanel, StatusBarFooter etc. All these, including the MainWindow, inherit from the abstract UiPart class which captures the commonalities between classes that represent parts of the visible GUI.
The UI component uses the JavaFx UI framework. The layout of these UI parts are defined in matching .fxml files that are in the src/main/resources/view folder. For example, the layout of the MainWindow is specified in MainWindow.fxml
The UI component,
- executes user commands using the
Logiccomponent. - listens for changes to
Modeldata so that the UI can be updated with the modified data. - keeps a reference to the
Logiccomponent, because theUIrelies on theLogicto execute commands. - depends on some classes in the
Modelcomponent, as it displaysPersonobject residing in theModel.
Logic component
API : Logic.java
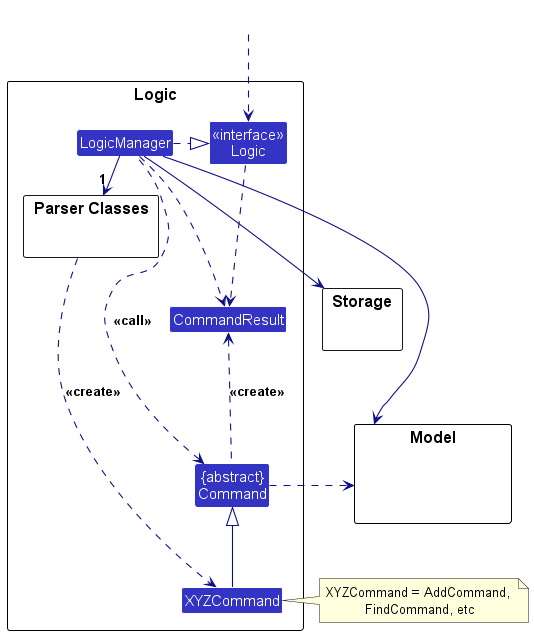
Here’s a (partial) class diagram of the Logic component:
The sequence diagram below represents a generic model for command execution within the Logic component, specifically illustrating the interaction for the execute(“…”) API call. This model serves as a foundational framework that can be used for various command types, demonstrating how the LogicManager invokes the execute method.
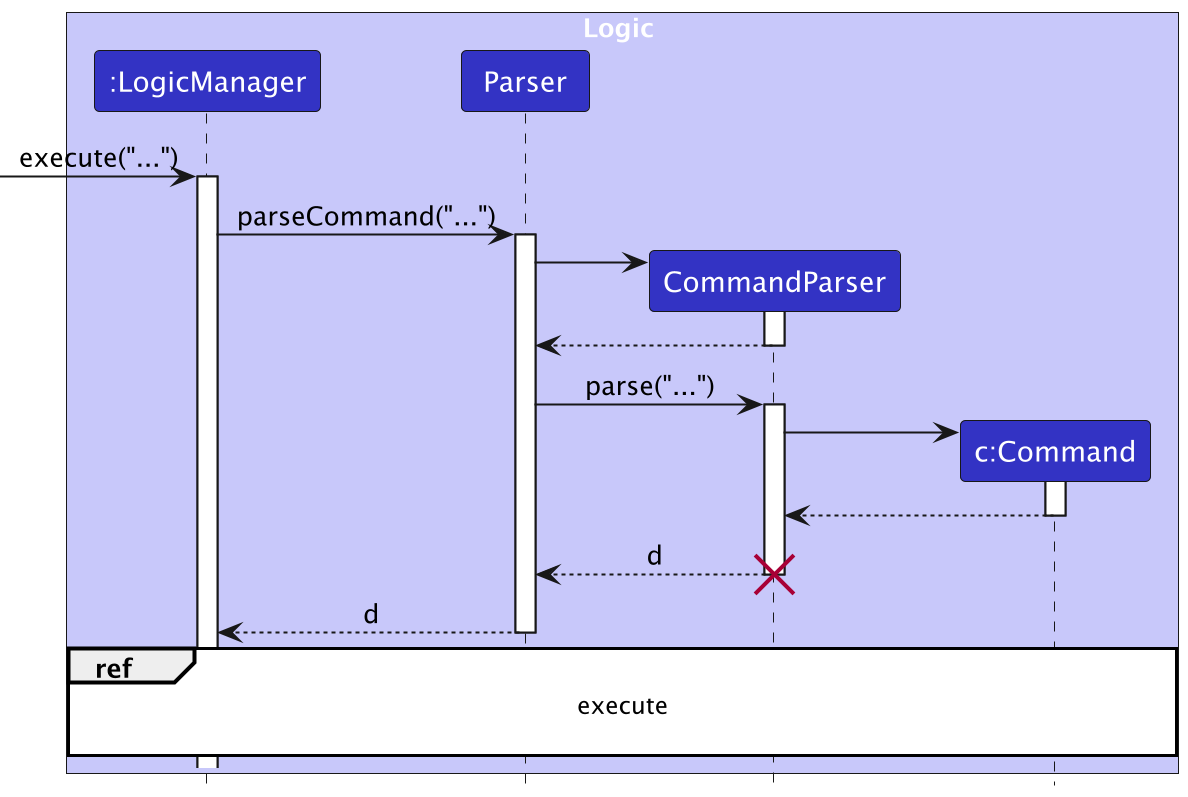
Note: The lifeline for CommandParser should end at the destroy marker (X) but due to a limitation of PlantUML, the lifeline continues till the end of diagram.
How the Logic component works:
- When
Logicis called upon to execute a command, it is passed to anAddressBookParserobject which in turn creates a parser that matches the command (e.g.,DeleteCommandParser) and uses it to parse the command. - This results in a
Commandobject (more precisely, an object of one of its subclasses e.g.,DeleteCommand) which is executed by theLogicManager. - The command can communicate with the
Modelwhen it is executed (e.g. to delete a person).
Note that although this is shown as a single step in the diagram above (for simplicity), in the code it can take several interactions (between the command object and theModel) to achieve. - The result of the command execution is encapsulated as a
CommandResultobject which is returned back fromLogic.
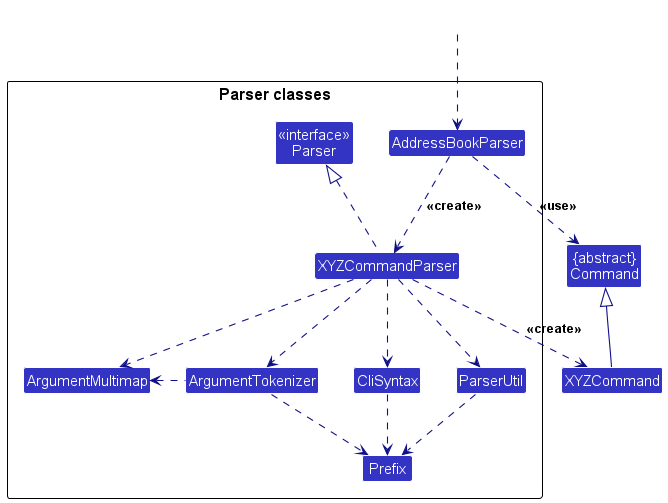
Here are the other classes in Logic (omitted from the class diagram above) that are used for parsing a user command:
How the parsing works:
- When called upon to parse a user command, the
AddressBookParserclass creates anXYZCommandParser(XYZis a placeholder for the specific command name e.g.,AddCommandParser) which uses the other classes shown above to parse the user command and create aXYZCommandobject (e.g.,AddCommand) which theAddressBookParserreturns back as aCommandobject. - All
XYZCommandParserclasses (e.g.,AddCommandParser,DeleteCommandParser, …) inherit from theParserinterface so that they can be treated similarly where possible e.g, during testing.
Model component
API : Model.java
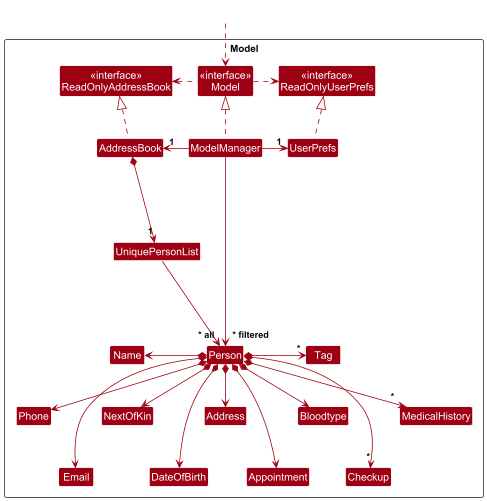
The Model component,
- stores the address book data i.e., all
Personobjects (which are contained in aUniquePersonListobject). - stores the currently ‘selected’
Personobjects (e.g., results of a search query) as a separate filtered list which is exposed to outsiders as an unmodifiableObservableList<Person>that can be ‘observed’ e.g. the UI can be bound to this list so that the UI automatically updates when the data in the list change. - stores a
UserPrefobject that represents the user’s preferences. This is exposed to the outside as aReadOnlyUserPrefobjects. - does not depend on any of the other three components (as the
Modelrepresents data entities of the domain, they should make sense on their own without depending on other components)
Storage component
API : Storage.java
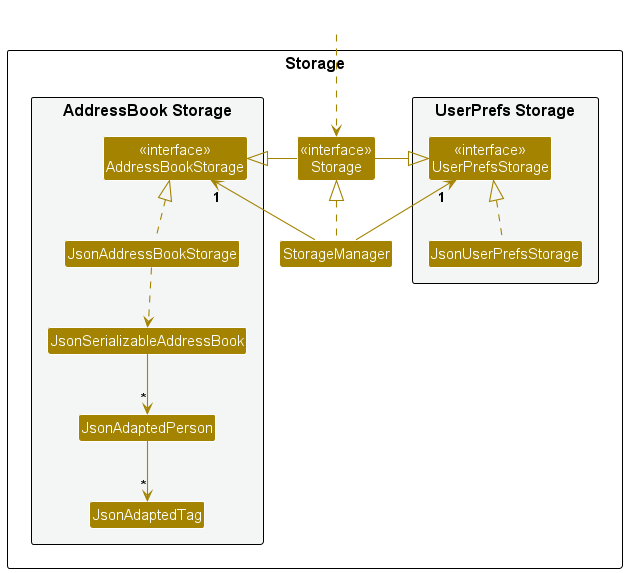
The Storage component,
- can save both address book data and user preference data in JSON format, and read them back into corresponding objects.
- inherits from both
AddressBookStorageandUserPrefStorage, which means it can be treated as either one (if only the functionality of only one is needed). - depends on some classes in the
Modelcomponent (because theStoragecomponent’s job is to save/retrieve objects that belong to theModel)
Common classes
Classes used by multiple components are in the seedu.address.commons package.
🔝 Back to Design 🔝 Back to Table of Contents
Implementation
This section describes some noteworthy details on how certain features are implemented.
Add Feature
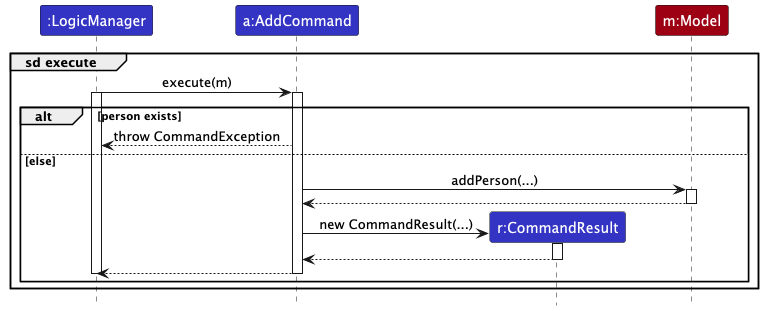
The add command allows the user to add a new person to the address book.
LogicManagerreceives the command text and passes it toAddressBookParser.AddressBookParserparses the command and returns anAddCommandobject.AddCommand#execute()adds the person to the model and returns aCommandResult.
Design considerations:
We chose to implement parsing with a ParserUtil helper class to simplify each command parser. An alternative would be using a central parser for all commands, but this was less modular.
Edit Feature
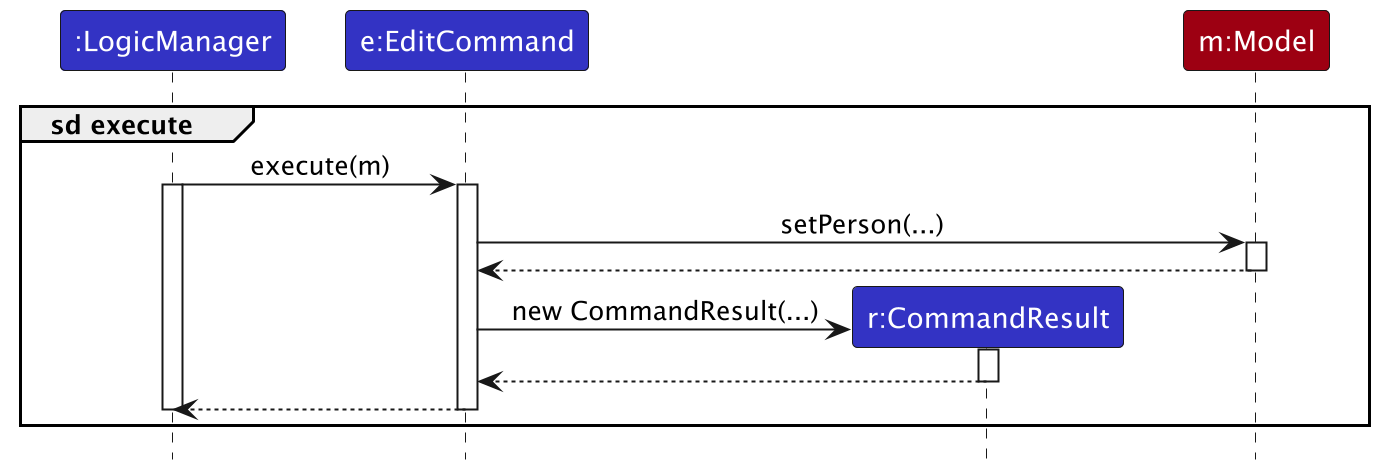
The edit command allows the user to edit an existing person in the address book.
LogicManagerreceives the command text and passes it toAddressBookParser.AddressBookParserparses the command and returns anEditCommandParserobject.EditCommandParser#parse()creates anEditCommandobject.EditCommand#execute()edits the person in the model and returns aCommandResult.
Design considerations:
We chose to implement parsing with a ParserUtil helper class to simplify each command parser. An alternative would be using a central parser for all commands, but this was less modular.
List Feature
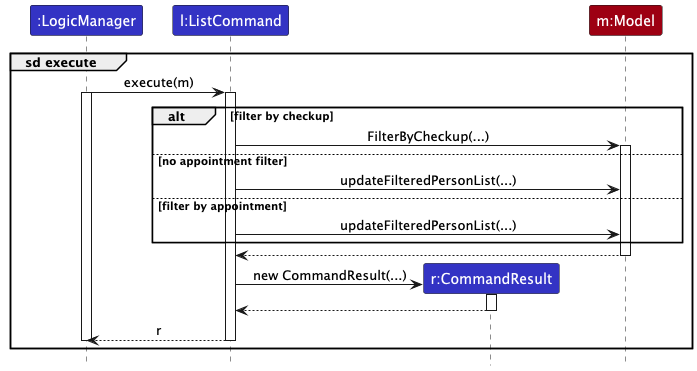
The list command allows users to display a subset of people in the address book based on optional filters.
It supports the following use cases:
list— Lists all persons in the address book (patients and nurses).list nurseorlist patient— Lists only nurses or only patients, respectively.list checkup— Lists all patients with scheduled checkups, sorted by earliest checkup date.
Execution Flow:
LogicManagerreceives the command text (e.g.,"list checkup") and passes it toAddressBookParser.AddressBookParserparses the command and returns anListCommandParserobject.ListCommandParser#parse()constructs aListCommandobject, based on the input string.ListCommand#execute()evaluates the internal flags:- If the command was
list checkup, it callsupdateFilteredPersonListByEarliestCheckup(...)with aPersonHasCheckupPredicate. - If no filter was provided, it lists all persons using
Model.PREDICATE_SHOW_ALL_PERSONS. - If a specific appointment filter was provided (e.g.,
"nurse"), it filters withPersonHasAppointmentPredicate.
- If the command was
- A
CommandResultis returned with a success message indicating what was listed.
Design considerations:
We chose to centralize filtering logic inside ListCommand, separating parsing (ListCommandParser) from behavior. This approach improves maintainability and makes it easy to extend filtering options (e.g., by tag or medical history) in the future.
Find Feature
The find command enables users to search for specific entities in the address book, including:
- Nurses assigned to the patients.
- Patients associated with the nurses.
- Users whose names contain the specified search terms.
This functionality improves user experience by allowing quick access to relevant information.
Execution Flow:
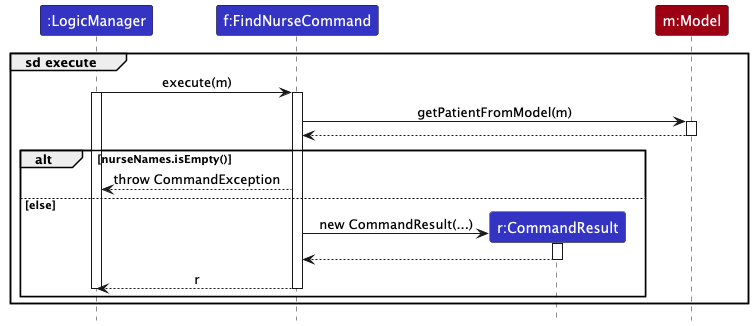
LogicManagerreceives the command text (e.g.find nurse of patient 8) from the user and passes it toAddressBookParser.AddressBookParserparses the command and returns aFindCommandParserobject.- Depending on the arguments,
FindCommandParser#parse()will return one of the following:FindNurseCommand: for searching nurses assigned to a specific patient.FindPatientCommand: for searching patients assigned to a specific nurse.FindCommand: a general command for searching based on keywords in contacts’ names.
FindCommand#execute()retrieves the relevant entries from the model and returns aCommandResult.- For
FindNurseCommand, it finds and returns all nurses assigned to the specified patient. - For
FindPatientCommand, it finds and returns all patients assigned to the specified nurse. - For
FindCommand, it allows the user to search by keywords. For example, executingfind tom harrywill return all users that contain either “tom” or “harry” in their names.
Using this command, users can effortlessly navigate and manage their address book, finding relevant information quickly and efficiently.
Design considerations:
We chose to implement parsing with a ParserUtil helper class to simplify each command parser. An alternative would be using a central parser for all commands, but this was less modular.
Assign Feature
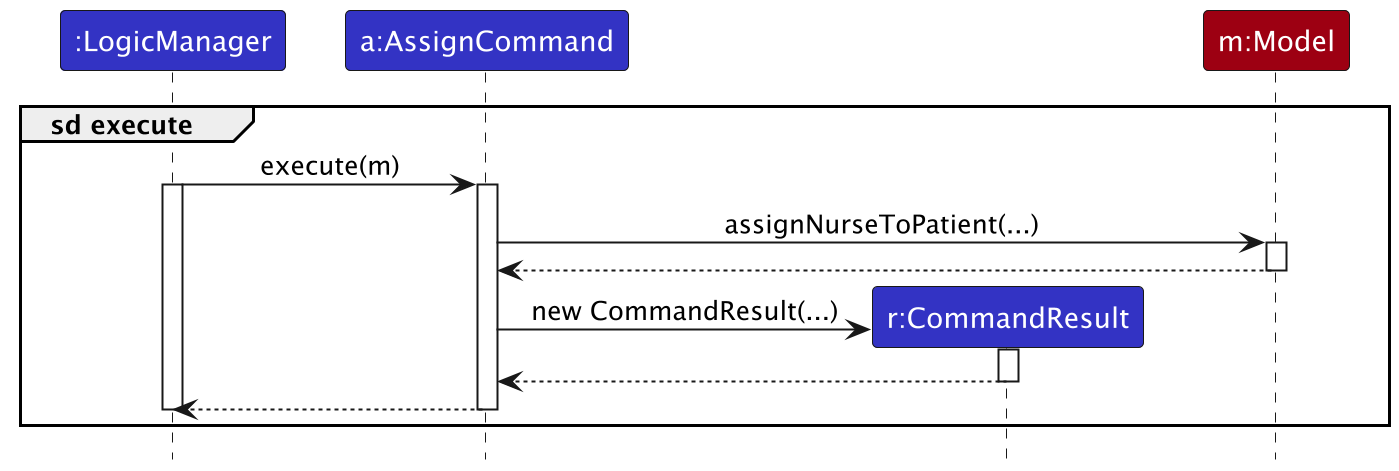
The assign command allows the user to assign a nurse to a patient.
Execution Flow:
LogicManagerreceives the command text and passes it toAddressBookParser.AddressBookParserparses the command and returns anAssignCommandobject.AssignCommand#execute()assigns the nurse to the patient and returns aCommandResult.
Design considerations:
We chose to implement parsing with a ParserUtil helper class to simplify each command parser. An alternative would be using a central parser for all commands, but this was less modular.
Schedule Feature
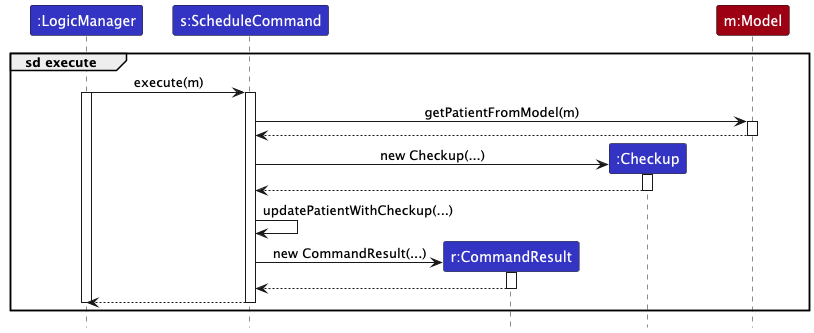
The schedule command allows the user to create a checkup between a patient and a nurse.
Execution Flow:
LogicManagerreceives the command text and passes it toAddressBookParser.AddressBookParserparses the command and returns anScheduleCommandobject.ScheduleCommand#execute()creates or deletes the checkup from the patient and returns aCommandResult.
Design considerations:
We chose to implement parsing with a ParserUtil helper class to simplify each command parser. An alternative would be using a central parser for all commands, but this was less modular.
🔝 Back to Implementation 🔝 Back to Table of Contents
Documentation, logging, testing, configuration, dev-ops
Appendix: Requirements
Product scope
Target user profile:
- Manager or nurse at a private nurse agency
- has a need to manage a significant number of nurses and/or patients
- prefer desktop apps over other types
- can type fast
- prefers typing to mouse interactions
- is reasonably comfortable using CLI apps
Value proposition:
- Manage nurse and patients faster than a typical mouse/GUI driven app
- Allows faster creation and storage of details compared to traditional pen and paper methods
- Enables easy transfer and tracking of patients compared to current system where it is inefficient to do so
- Saves time from having to log into centralised system from healthcare system in Singapore each time data is needed.
User stories
Priorities: High (must have) - * * *, Medium (nice to have) - * *, Low (unlikely to have) - *
| Priority | As a … | I want to … | So that I can… |
|---|---|---|---|
* * * |
Manager | add nurse contacts | add new nurses contacts who joined the team |
* * * |
Manager | delete nurse contacts | remove contact of nurses who leave the agency |
* * * |
Manager | add patients contacts | keep track of new patients who register with the agency |
* * * |
Manager | delete patient contacts | remove patients who are no longer registered with the agency |
* * * |
Manager | view all nurses | see all nurses details at once |
* * * |
Manager | view all patients | see all registered patients at once |
* * * |
Nurse | view patients details | view the needs of the patient I’m caring for |
* * * |
Nurse | exit the application quickly | resume other tasking at hands |
* * |
Manager | view all patients attached to a certain nurse | check which patients a nurse is currently assigned to |
* * |
Manager | view the nurse assigned to a patient | check who is in charge of a certain patient |
* * |
Manager | schedule appointments for a patient | ensure the patient has an appointment and a nurse |
* * |
Manager | assign a nurse to a patient | ensure the patient has a specified nurse |
* * |
Manager | sort patient details | sort my patients according to various criteria such as blood type and severity level |
* * |
Manager | assign categories to patients | add the severity of each patient |
* * |
Manager | adjust categories of patients | lower or increase the severity / priority of patients over time |
* * |
Nurse | find patient details | check details about a specific nurse |
* * |
Nurse | sort patient details | quickly find details about a specific patient |
* * |
Nurse | transfer the patients under me to another nurse | ensure my patients are not neglected during my absence |
* |
Manager | add roles of nurses | see which nurse has a larger responsibility |
* |
Forgetful Nurse | schedule automatic reminders for task like checkups and medications times | task are always done on time |
* |
Nurse during a midnight shift | activate night mode interface with darker colours and larger text to enhance visuals | reduce eye strain while ensuring accuracy when recording patient data in dimly lit environments |
* |
Manager | log in using my staff credential | Securely access patient records |
Use cases
(For all use cases below, the System is the MediBook and the Actor is the user, unless specified otherwise)
Use case 1: Delete a nurse / patient
MSS
- User requests to list nurses / patients
- AddressBook shows the list of nurses / patients
- User requests to delete a specific nurse / patient in the list
-
AddressBook deletes the nurse / patient
Use case ends.
Extensions
-
2a. The list is empty.
Use case ends.
-
3a. The given index is invalid.
-
3a1. AddressBook shows an error message.
Use case resumes at step 2.
-
Use case 2: Add a nurse / patient
MSS
- User requests to list nurses / patients
- AddressBook shows the list of nurses / patients
- User requests to add a nurse / patient in the list
-
AddressBook adds the nurse / patient
Use case ends.
Extensions
-
2a. The list is empty.
Use case ends.
-
3a. The user enters incorrect command format.
-
3a1. AddressBook shows an error message.
Use case resumes at step 2.
-
Use case 3: Edit a nurse / patient
MSS
- User requests to list nurses / patients
- AddressBook shows the list of nurses / patients
- User requests to edit a nurse’s / patient’s details
-
AddressBook edits the nurse’s / patient’s details
Use case ends.
Extensions
-
2a. The list is empty.
Use case ends.
-
3a. The user enters incorrect command format.
-
3a1. AddressBook shows an error message.
Use case resumes at step 2.
-
Use case 4: Exit the app
MSS
- User requests to exit app
-
AddressBook closes
Use case ends.
Extensions
- 1a. The user enters incorrect command format.
-
1a1. AddressBook shows an error message.
Use case resumes at step 1.
-
Non-Functional Requirements
- Should work on any mainstream OS as long as it has Java
17or above installed. - Should be able to hold up to 1000 persons without a noticeable sluggishness in performance for typical usage.
- A user with above average typing speed for regular English text (i.e. not code, not system admin commands) should be able to accomplish most of the tasks faster using commands than using the mouse.
Glossary
- Patient Contact: Refers to the information stored about a patient in the system (e.g: Name, Phone number, Email, Address, Appointment, Blood Type, next-of-kin)
- Appointment: The role of the person
- Manager: Manages the nurses
- Nurse: Tends to the patients
- Checkup: A scheduled appointment for nurse to visit and treat the patient.
🔝 Back to Requirements 🔝 Back to Table of Contents
Appendix: Instructions for manual testing
Given below are instructions to test the app manually.
Note: These instructions only provide a starting point for testers to work on; testers are expected to do more exploratory testing.
Launch and shutdown
-
Initial launch
-
Download the jar file and copy into an empty folder
-
Open a command terminal,
cdinto the folder you put the jar file in, and use thejava -jar MediBook.jarcommand to run the application.
-
-
Saving window preferences
-
Resize the window to an optimum size. Move the window to a different location. Close the window.
-
Re-launch the app by going into the terminal,
cdinto the folder you put the jar file in, and use thejava -jar MediBook.jar.
Expected: The most recent window size and location is retained.
-
-
Shutdown
- Type exit into the app CLI
Expected: The MediBook application closes.
- Type exit into the app CLI
Deleting a person
-
Deleting a person while all persons are being shown
-
Prerequisites: List all persons using the
listcommand. Multiple persons in the list. -
Test case:
delete 1
Expected: First contact is deleted from the list. Details of the deleted contact shown in the status message. Timestamp in the status bar is updated. -
Test case:
delete 0
Expected: No person is deleted. Error details shown in the status message. Status bar remains the same. -
Other incorrect delete commands to try:
delete,delete x,...(where x is larger than the list size)
Expected: Similar to previous.
-
Adding a person
- Adding a person while all persons are being shown
- Prerequisites: List all persons using the
listcommand. Multiple persons in the list. - Test case:
add n/John Doe dob/01/01/2001 p/98765432 e/johnd@example.com a/311, Clementi Ave 2, #02-25 b/AB+ ap/Patient nok/Jane 91234567 t/newcomer mh/Diabetes mh/High Blood Pressure
Expected: A new contact is created and the displayed person list is updated.
- Prerequisites: List all persons using the
- Adding a person using only compulsory fields
- Test case:
add n/John Sim dob/01/01/2025 p/98765432 a/123 Block 7 b/AB+ ap/patient
Expected: Creates a new patient contact with the minimum fields included.
- Test case:
- Adding a duplicate person
- Prerequisites: A person by the name of John Sim has been created either through the previous test case or by manual testing.
- Test case:
add n/John Sim dob/01/01/2025 p/98765432 a/123 Block 7 b/AB+ ap/patient
Expected: No person is created. Error message shows “This person already exists in the address book”
- Other incorrect commands to try:
- Invalid names: names containing non-alphabetical symbols
- Invalid number: Less than 3 digits or non integer inputs
- Invalid Date of Birth: Non integer and non slash inputs, incorrect date format (DD/MM/YYYY)
- Invalid Blood type: Not matching any of the 8 specified blood types.
- Invalid Appointment: Not matching patient or nurse, non-alphabetical inputs
Editing a Person
- Editing any field of a person currently being displayed
- Prerequisites: List all persons using the
listcommand. Multiple persons in the list. - Test case:
edit 2 n/Samantha
Expected: Changed the name of the person at index 2 of the displayed list to Samantha. - Testing other fields that can be edited:
- Editing tags
- Test case:
edit 1 t/discharge t/No family
Expected: Removes all tags of the person at index 1 and creates 2 tags for that person.
- Test case:
- Medical History
- Use
Viewcommand to check medical history- Test case:
edit 1 mh/Diabetes
Expected: Removes the medical history of the patient at index 1 and creates a new medical history containing diabetes. If the person is a nurse, an error will occur as medical history should not be added to a nurse. - Test case:
edit 1 mh/
Expected: Clears the medical history of the person.
- Test case:
- Use
- Appointment
- NOTE Patients contacts can only be converted to Nurse appointment if it does not contain any medical history
- Test case:
edit 2 ap/nurse - Expected: Changes the patients appointment to a nurse if there is no medical history. Returns an error if the patient does have medical history.
- Test case:
- NOTE Patients contacts can only be converted to Nurse appointment if it does not contain any medical history
- Other fields to try: name, phone_number, blood_type, address, next_of_kin and email.
- Editing tags
- Prerequisites: List all persons using the
Listing persons
- Listing all people, people based on appointments (nurse or patient), or based on checkups scheduled
- Prerequisites: Multiple persons have been created and can be displayed.
- Test case:
list
Expected: Displays all contacts (nurses and patients). - Test case:
list patient
Expected: Displays all patients. - Test case:
list nurse
Expected: Displays all nurses. - Test case:
list checkup
Expected: Displays all patients with checkups scheduled, sorted from earliest to latest.
Finding persons
- Finding people by name or part of name
- Prerequisites: List all persons using any
listcommand. Multiple persons in the list. - Test case:
find John
Expected: Displays contacts whose names containJohnin any part of their name. - Test case:
find hn
Expected: Displays contacts whose names containhnin any part of their name. E.g.Johnwill be displayed. - Test case:
find hn ce
Expected: Displays contacts whose name containhnorcein any part of their name. E.g.JohnandAlicewill be displayed.
- Prerequisites: List all persons using any
- Finding nurse(s) assigned to a patient
- Prerequisites: List persons using any
listcommand. Multiple persons in the list. At least 1 patient has a nurse assigned to them. - Test case:
find nurse of patient 2
Expected: Displays nurse(s) assigned to patient at index 2 in the result box.
- Prerequisites: List persons using any
- Finding patient(s) who have a specified nurse assigned to them
- Prerequisites: List persons using any
listcommand. Multiple persons in the list. At least 1 patient has a nurse assigned to them. - Test case:
find patient of nurse 2
Expected: Displays patients(s) assigned to nurse at index 2 in the result box.
- Prerequisites: List persons using any
Assigning a nurse to a patient
- Assigning a nurse to a patient by their index numbers
- Prerequisites: List all persons using the
listcommand. Multiple persons in the list where at least 1 nurse and at least 1 patient person exists. - Test case:
assign 6 2
Expected: Patient at index 6 is assigned to nurse at index 2. - Test case:
assign
Expected: Shows an invalid command format error message with usage instructions. - Other incorrect commands to try:
- Missing an argument: no
NURSE_INDEXspecified - Invalid index: using non-numeric characters for index values
- Assigning a third nurse to a patient that has already been assigned 2 nurses.
- Missing an argument: no
- Prerequisites: List all persons using the
Removing nurse assignment from a patient
- Removing the assignment of a nurse from a patient
- Prerequisites: List all persons using the
listcommand. Multiple persons in the list. Patients with assigned nurses exist. - Test case:
assign delete John Doe 6
Expected: Removes the assigned nurse with nameJohn Doefrom the patient at index 6. - Test case:
assign delete
Expected: Shows an invalid command format error message with usage instructions. - Other incorrect commands to try:
- Missing an argument: no
NURSE_NAMEorPATIENT_INDEXspecified - Invalid index: using non-numeric characters for the index value
- Missing an argument: no
- Prerequisites: List all persons using the
Schedule checkups
- Adding a checkup to a patient
- Prerequisites: List all persons using the
listcommand. Multiple persons in the list. At least 1 person with appointment ofPatient. - Test case 1:
schedule add for patient 6 12/12/2025 1200
Expected: Creates a checkup for the patient at index 1 at the given time. - Test case 2:
schedule add for patient 6 01/01/2026 1105
Expected: Error message showing “Please use a time in blocks of 00, 15, 30, or 45 minutes (e.g., 1000, 1015, 1030, 1045).” - Test case:
schedule add for patient 6 12/12/2025 1200Expected: Error message saying “A checkup is already scheduled at this datetime.” (if you executed test case 1 resulting in a duplicate checkup). - Test case:
schedule add for patient 6 12/12/2025 1205
Expected: Error message saying “There’s a checkup scheduled on 12/12/2025 12:00! Please choose another time / date” (if you have executed test case 1 resulting in a checkup at 1200 on the same day). - Invalid inputs to test out
- Date or time missing e.g.
schedule add for patient 6 - Person at given index is not a patient
- Missing syntax e.g.
schedule 6 12/12/2025 1205
- Date or time missing e.g.
- Prerequisites: List all persons using the
- Removing a checkup from a patient
- Prerequisites: List all persons using the
listcommand. Multiple persons in the list. At least 1 person with appointment ofPatientwith at least 1 scheduled checkup. - Test case:
schedule delete for patient 6 12/12/2025 1200
Expected: Checkup at given date time will be removed from the patient at index 6. - Test case:
schedule delete for patient 6 12/12/2025 1700
Expected: If there is no checkup created at that time yet, an error message saying that there is no such checkup will be shown. Else, same as test case above.
- Prerequisites: List all persons using the
Viewing nurses / patients
- Viewing nurse or patient details
- Prerequisites: List all persons using the
listcommand. Multiple persons in the list. - Test case:
view INDEX
Expected: Displays details for the contact atINDEX. If this contact is a patient and has medical history details, the medical history will be listed. - Test case:
view
Expected: Shows an invalid command format error message with usage instructions. - Other incorrect commands to try:
- Missing index value
- Invalid index: using non-numeric characters for the index value
- Too many arguments: entering multiple index values
- Prerequisites: List all persons using the
Saving data
-
Dealing with missing/corrupted data files
- Simulate a corrupted file by editing the saved .json file such that it is no longer in json format. This should result in a empty screen upon start up.
- Delete the file and restart the app to recover and start with a small list of sample contacts.
🔝 Back to Manual Testing 🔝 Back to Table of Contents
Appendix: Planned Enhancements
[Team size: 5]
These are some features / improvements our team has planned to implement in the future due to lack of time.
- Patient medical history can be edited and added on to existing medical history.
- Currently, editing patient medical history will remove the existing medical history, meaning that if the user wants to keep the existing medical history, they would need to re-enter everything again.
- For future enhancements, we plan to allow users to add on to the existing medical history when they edit a patient’s medical history.
- There will also be a separate command that will allow users to delete specific medical history entries for a patient.
- The
assigncommand will have a command format that is more intuitive and be easier to remember for users.- Currently, the
assigncommand has the format:assign PATIENT_INDEX NURSE_INDEX, which is slightly hard to understand and is not the most intuitive. - For future enhancements, we plan to modify to command format to something similar to the following:
assign nurse NURSE_INDEX to patient PATIENT_INDEX.
- Currently, the
- More nurses can be assigned to one patient.
- Currently, the maximum number of nurses that can be assigned to a patient is 2.
- For future enhancements, we may increase the number of nurses that can be assigned to a patient, as this would be more realistic for cases where multiple nurses would be needed to attend to one patient.
- Corrupted JSON file will be handled gracefully.
- Currently, a blank page will be displayed if the JSON file is corrupted.
- For future enhancements, we may display a warning message to the user, and instructions would be given for reloading the app or retrieving sample data.
- Reminders can be added for checkups.
- Currently, checkups can be scheduled for a patient, but nurses will not receive a reminder about the checkups for the patients that they are assigned to.
- For future enhancements, a reminder feature would allow nurses to receive reminders in advance for the patient checkups that they are assigned to.
- Warning messages will be displayed when scheduling checkups for patients who do not have any assigned nurses.
- Currently, users are allowed to schedule checkups for patients even if the patient does not have any nurses assigned to them.
- For future enhancements, a warning will be displayed to alert the user that the patient they are scheduling a checkup for does not have any assigned nurses.
- Nearly similar person
edithandling is not consistent due to the search functionality.- A nearly identical person refers to a person that has all of the same person attributes as another person, except
for any one of these attributes:
name,phone numberanddate of birth. - Currently, the
editcommand may not work if it is applied to a nearly similar person, that is not the first person in line among the nearly identical person, shown in the current list. editwill tend to edit the first person in line among the nearly identical persons, instead of the one that is intended to be edited (i.e. the nearly identical person not first in line).
- A nearly identical person refers to a person that has all of the same person attributes as another person, except
for any one of these attributes:
- Finding by other fields such as blood type or tags.
- Sorting lists by other fields such as blood type.
- Allow for assigning severity to better manage patients.
Appendix: Effort
Difficulty Level
Our project was highly complex as it expanded on the AddressBook 3 (AB3) baseline . We had to manage multiple new entity types such as patients, nurses, appointments, checkups and medical history compared to AB3 which only manages 1 person entity. Our project required careful coordination and encapsulation of all related data attributes.
Challenges Faced
- Multi-entity Integration
- We introduced distinct roles like patient and nurse via an appointment field and had to integrate these new fields into the system. E.g. adjusting both add and edit functions to allow the changes to these fields.
- We then had to design features specific to these such as nurse assignment and checkup scheduling.
- Checkup Scheduling
- Implementing checkup scheduling requires the introduction of a Checkup entity and validations like conflicting checkups.
- Optional and Validated Fields
- We added some optional fields like NextOfKin, which necessitated custom validation logic while ensuring the rest of the systems remained robust.
- Command Complexity
- We had to design new commands like assign and schedule, as well as enhance the current existing commands in AB3 (add, edit, list, etc.). These had to handle entity-specific behavior such as enforcing rules and validations.
Effort Required
Our project required effort in these 4 main aspects:
- Design and Refactoring
- Significant refactoring was done to support distinct entity behavior while keeping the core model extensible.
- Command System
- Multiple new commands and parser classes were developed to enable features like nurse-patient assignment and checkup scheduling.
- Validation and Edge Cases
- Custom checks were built into the logic and parser layers to prevent invalid operations (e.g., assigning a non-nurse or scheduling duplicate checkups).
- Testing and Debugging
- Each new command and behavior introduced unique test cases. We implemented extensive unit and integration tests to ensure system reliability.
Achievements
Despite the complexity and effort required, our final project offers a user-friendly and extensible system. Our main achievements in this project were: implementing scheduling of medical checkups with conflict management implemented, list command with important filters such as checkup existence, allowing more optional fields like next of kin and email to provide more flexibility to the user, and last but not least adjusting requirements of duplicate persons to better match real world situations.